Overview
PbUnit is a small framework to facilitate creating and running unit tests for PowerBASIC. The framework facilitates testing Subs, Functions, FastProcs, and Class Interface Methods and Properties. i.e. executable code. There is no direct facility for testing variables and data except through code interaction. From a code coverage perspective it's worth noting that I couldn't think of a good way to directly test class methods. I would be interested in others perspective. At the moment I'm leaning toward interface injection that would add a uniquely named interface to each class that would stub the call to each class method. Currently the framework will not test any entry routines such as PbMain, LibMain, etc. You may unit test routines designed to compile to an EXE, DLL, or SLL. You will typically use the following six steps to create unit tests:
Steps
1) Create a base test file.
A typical test file will start with the following three lines.[PbUnit]
Source=fullpath_to_primary_source_file
Output=fullpath_to_test_source_file
In addition I have taken to giving these files a .test extension. To make working with these in the PB/IDE go to the menu Window | Options, choose the Editor tab and change the PB Include line to .bi|.inc|.test After making this change any files you open with a .test extension will be syntax highlighted and if you use the long forms of includes and tests you can use F2 to get a list of unit tests. You will have to close the PB/IDE and re-open it before it will be a standard extension in File open. If that sounds like too much work, I initially used the .bi extension and it worked well to separate unit tests from other PowerBASIC source files.
2) Add unit test skeletons for routines.
This optional repeatable step will add a unit test for any routines that don't currently have a test based on PbUnits naming convention. To accomplish this run:PbUnit testFile /add
3) Write unit tests.
More on that a bit later.4) Sequence unit tests.
This optional repeatable step will add an __# to make each test have a unique name. To accomplish this run:PbUnit testFile /seq
5) Generate a unit test application.
This combines all the source from the primary source file and adds both the expanded tests as well as a small framework to interact and run the tests with. To do this simply run:PbUnit testFile
6) Compile and run the generated unit test application.
If the application was originally a Console app, use the console compiler, if the application was originally a Windows app, use the Windows compiler.Details
Create a base test file
Following is a brief summary of the three lines.[PbUnit]
This must be the first line and identifies the file as being a PbUnit test source file.
Source=fullpath_to_primary_source_file
This identifies the file that contains the routines you wish to write unit tests for. This can be the application primary source file or simply one of the include files that contains classes or routines. This field is required and provides the base routines that will be unit tested.
Output=fullpath_to_test_source_fileThis optional line identifies the name of the unit test application. It will have a .bas file and will overwrite any file with that name. Be sure not to specify the name of a file you use for other purposes as it will be destroyed. If you do no provide a name, the framework will generate a file name as follows:
base_path_to_primary_source\TEST\primary_source_file_name_TEST.bas
Add unit test skeletons for routines
This optional process may be run repeatedly as you add new routines to ensure the unit testing framework has a test for every routine. The tests will be named for the routine they are testing, will include a comment with the routines signature, and will end with an Assert 0. Assert 0 says Fail this test. More on a unit test in the next section.
Write unit tests
Warning! This is one of the larger topics and is really at the heart of unit testing. While the topic is fairly large, there are really only a few concepts and should be mastered fairly easily.Include
There's really two parts to this. 1) Included code 2) Unit test code.
Included code is simply code you want to define outside of a unit test. Often this would be done for repetitive setup or teardown code. Included code must always have a name. The beginning of included code must take one of the following two formats:
<includeName
Macro includeName
For the purposes of the framework either is identical. The first is shorter and faster to type, the second allows use of the F2 key from the PB IDE. It's worth noting that Macro in the Unit test framework is simply included text. It is not a PowerBASIC macro. At this time let me demonstrate two short includes. When we discuss writing unit tests next, we'll use these.
Macro cTest_setup
Local obj As iTest
obj = Class "cTest"

Macro cTest_done
obj = Nothing
The first include will put in two lines to define an object variable and instantiate an instance of the variable. The second include destroys the object. You can literally put any valid PB code here that makes sense inside of a routine including assembler. The purpose of includes is to make typing code lines repeated on many tests much faster and easier.
Unit test
Unit test code is generally code that performs one test, hence the name unit test. Often there will be a line or two of code about which you will make an assertion. An assertion is simply a statement of fact like "I assert that A is the third character". Unit tests must take one of the following two forms:
>testName[,tag[,tag...]]
Sub testName[,tag[,tag]]
As with includes, the first form is faster to type, the second allows the use of the F2 key in the PB/IDE. It is worth noting that a Sub in the unit test framework is not a PowerBASIC sub, although there will be a PowerBASIC sub created for each unit test it will not bear this name. You might also be wondering what tag is for. tag is simply a short name that can be used to find a group of related unit tests. Later you will see how this can be used to run tests with a given tag.
Before we write a unit test, lets first look at an example of code added by the framework:
Sub value.iTest.cTest
' Property Set Value( ByVal value As Long )
Assert 0
In this case the unit test is testing the Set Value property of the iTest interface in the cTest class. Notice when the framework added this skeleton, it provided a name that indicated what was being tested, the signature of the property, and an assertion of fail. It's generally a good practice to assume failure until you actually do something you expect to succeed. This way you can have a positive way to identify tests you haven't written as well as tests that show problems with the code. Let's flesh this out into a small test.
Sub value.iTest.cTest
' Property Set Value( ByVal value As Long )
+cTest_setup
obj.value = 5
Assert obj.value = 5
+cTest_done
First we see +cTest_setup. This is simply replaced with the two lines of code we defined earlier. Next we assign 5 to the Value property of obj. Remember obj was defined and instantiated in the cTest_setup include. Next we make our assertion: After assigning 5 to obj.Value, obj.Value is equal to 5. Finally +ctest_done sets obj to Nothing. To facilitate understanding what's happening, when PbUnit writes a test for this it could look like the following:
Sub pbuTest_23()
Local obj As iTest
obj = Class "cTest"
obj.Value = 5
Call pbuAssert( obj.Value = 5, "obj.Value = 5" )
obj = Nothing
End Sub
The end result is not a miracle and I'm sure you can see how it was done. In fact you may be asking, if that's really all that happened, why wouldn't I just write that? The short answer is you could. But the PbUnit framework while simple provides several facilities that lessen the work of writing and running unit tests. When combined the facilities should provide enough benefit that you'll appreciate using this or another unit testing framework.
Assert
In the above test we used the word Assert that used the condition to also generate a message:Assert obj.Value = 5
Assert conditionAssert2 condition, message
Assert value = 5
Assert2 value = 5, Format$(value) + " = 5 <-valid value"
Skip
Sometimes you may have code that you have no plans to test. For those test cases you can simply use the word Skip. This will allow /add to add new routines without you constantly having to delete routines you don't intend to test. You'll also get an indication of how many tests were skipped. So if you select all tests, you'll get the total tests, the number of tests that passed out of the number of tests run with a percent, and the number of tests skipped. You'll also get a visual indicator that the test was skipped and the result will be colored blue. Below is an example of a skipped test.Sub Debug_DefineClassCreate
' Macro Debug_DefineClassCreate( msg)
Skip
Tags
There's one more aspect of unit testing you may want to take advantage of. Tags. Simply put tags give you a grouping names you can use to select sets of tests that are related in some way to you. Tags are totally independent and any two tags may common tests as well as unique tests, or tests that are in both tags and tests that are only in one of the tags. This optional grouping / filtering ability if used may come in handy particularly if you have a large number of tests. Following are some empty unit tests (they have no code or assertions) that demonstrate the use of tags.
Sub RoundedRect ,ui,Render
Sub Card ,ui, Render
Sub TextBox ,ui ,Control
Sub ComboBox ,ui,Control
Sub Timer,Control
Sub Combine
Sub InsertChar,edit
Theres some interesting things here. You may have noticed that some of the unit tests had a space after the name and before the comma and one of them did not. If you place a space after the the unit test name, you will not see the tags in the PB/IDE when using F2. If you don't place a space after the unit test name, you will see the tags in the PB/IDE when using F2. This is just pointed out as something you can take advantage of based on your preferences. You may have also noted that some tags had spaces before the comma, some after. The spaces are optional and can be used based on your preference and do not have to be consistent. Next you'll notice that some unit tests have more than one tag. You can have as many tags as you feel up to typing and your editor supports on a single line. Next you might notice that some tags are on more than one unit test, others are one only one, no tags are on none. i.e. tags are optional for unit tests but are not a feature by themselves. Further one test has no tags, the ui tag overlaps with render and control tags while the control tag has a routine unique only to it. You can really use or ignore tags as suits your needs. The small gui and command line interfaces later will let you quickly view, select, or run all unit tests by tag. Use the optional feature or not as you see fit.
User Routines
In addition to having unit tests and setup/tear-down code, you may find a need for a more general testing routine you would like to include and re-use. For example, let's say you need to standardize the path name of a file for a test so it would run on different users machines regardless of location, it might be nice to have a StandardizePath routine you could use. Or perhaps you want a generated GUID or current date, possibly in a predictable way (this is unit testing...). There could be many many other reasons you would want a special routine, how would I know? Well the good news is, when I started writing a few tests, I felt a need for it and now it's included. Simply write a Class Method without the End Method. In this case it's worth noting that the code you write here has to run as it exists. i.e. before a Sub was really a unit test and a Macro was really an include. Here Class Method's really are Class Methods in the output. The good news is that since PowerBASIC uses methods in classes for both Sub's and Function's, you can too. It's also worth noting, in this version care has been taken not to use the create and destroy class methods, so you're free to use those if you like as well. Here's a short example:
Class Method GetGUI() As String
Method = "Guid$(""{E1AD479F-CF56-472C-B642-B36C5F0F455C}"")"
User Variables
In addition to user routines you can also create variables to store data. Simply include a line such as Instance value As Long. The only restrictions are you can't use a name in use by the class already and the instance definition must fit on one line (you can't use continuations). I recommend if you add instance variables, you immediately run the unit tests to ensure it will compile (and you didn't use an existing name) before continuing. This will save you from having to rename a variable and all of it's uses later. Here's a short example:
Instance value As Long
An instance variable declaration will end a unit test, include, or class method. Generally you should put these at the top of the test file after any source or output directives.
Resource Files
Sometimes you may want to include a file for use when testing. You can of course use the Open/Close/Get$ statements, but in addition you may want to simply have a file built into the test framework as a resource. To facilitate that you can simply add the line #Resource RcData, 1, "filename" to your testing file. Note that 1 should be replaced with a source unique number for RcData resources, i.e. you can't have conflicts with existing RcData statements. One caveat is that filename must manually be placed relative to the generated test framework (the output directory).
Once you've included a file as a resource, you can access it with Resource$( RcData, 1 ). Note that the 1 here should be replaced with the unique number you used previously. Here's a short example:
#Resource RcData, 101, "MyFile.txt"
Sub MyTest
Local a As String
a = Resource$( RcData, 101 )
A #resource rcdata declaration will end a unit test, include, or class method. Generally you should put these at the top of the test file after any source or output directives.
Housekeeping
There's two last house keeping parts of writing unit tests. Comments and the end of tests. If you want to add a comment prior to any tests, just use an apostrophe PowerBASIC comment.
' this is a comment
Rem this is is not a unit test comment
Any comments you add before tests will not be part of the generated application. Comments you include inside of a unit test will be.
:End
This line means no more tests follow. When this is encountered, the rest of the file is ignored. You can use this to put a lot of comments at the end of the file, but I wouldn't. Today when you add new tests with /add, they will go at the bottom of the file, after :End if it exists. That means if you use :End, you will need to manually move it to the end of the file or new tests will never be run.
And last each unit test, include, or class method extends until another unit test, include, class method, #resource rcdata, instance, or :End is encountered. #resource and instance lines are always one line long, continuations are not allowed.
Sequence unit tests
If you're following along creating the unit test file as we go, you may have noticed something interesting: there's both a get and a set property with the same name. They look like the following:
Sub value.iTest.cTest
' Property Get Value() As Long
Assert 0

Sub value.iTest.cTest
' Property Set Value( ByVal value As Long )
Assert 0
You might ask yourself a few of questions: Can I have unit tests with the same name? Answer: Yes. Do I want two unit tests with the same name? Answer: No. Should have I have more than one test for a routine? Answer: Yes. Should I have more than one Assertion for a unit test. Answer No. The framework has no issues with two unit tests having the same name. You on the other hand may find it more difficult if one of them fails to determine which value.iTest.cTest failed. This would be compounded if the "unit" tests each made more than one assertion. And would really start to border on painful if the routines were physically separated from each other in the test file. Rather than sweat the small stuff and to facilitate creating new tests, you can simply re-copy an existing unit test and alter it for the new test. You should have many tests for Value.iTest.cTest, if you do how will you keep them separate? One way would be to add a unique suffix on the end of each test. You could do this by putting something meaningful there. This is however a fair amount of work and no guarantee you won't accidentally create two with the same name. Sequences to the rescue. Essentially sequencing simply adds a unique number to the end of each common name. The numbers are sequenced by the order tests with the same name appear. If you were to run
PbUnit testfile /seq
you would notice the lines above becoming:
Sub value.iTest.cTest__1
' Property Get Value() As Long
Assert 0

Sub value.iTest.cTest__2
' Property Set Value( ByVal value As Long )
Assert 0
The way sequencing works is it determines if a sequence, ___#, is added, removes it if it was, and then adds a new unique sequence to the name. This will make it easy to find a failing test since all tests will have a unique name. This is not a required step, but I think you'll find it quite handy if you write many tests.
Finally once we have one or more tests written we'd like to see if they pass!
Generate a unit test application
Once you've defined some tests, you'll be anxious to see if the tests work (and how you use them). To create the unit test application simply type:
PbUnit testfilePbUnit will take all the source files from the primary source file sub directory tree and combine them into a single file along with your testing routines and a framework for invoking them.
Compile and run the unit tests
Pay dirt! This is what we've been waiting for. Now that we have a test app, how do we run tests? Well first you open the test application in an IDE, use the one you wrote the application for PbWin or PbCC and compile. When you run the application there are two basic modes: Interactive and Command Line. Interactive is the default and will provide a small GUI for you (on both PbCC and PbWin applications). For the interactive feature to work PbuGui.DLL must be loadable by the application. If the application can't load PbuGui.dll, you'll get a message. I would recommend placing PbuGui.dll in a directory on your search path or writing all your unit tests to a single directory and placing the dll there. In command line mode you pass one or more commands and review the results. Following is the help displayed if you type testapp_test /?.
testapp_test /r {#|tag}[ {#|tag}...] /i /testcount /taglist /tagtests tag[ tag...] /testlist {#|tag}[ {#|tag}...] /o filename /a /nofile /?


/nofile - No output file is created.  If application is not console application no output of any kind occurs.


/r - run tests. parameter is followed by test #'s or tags to of tests to run.  Output will  contain test results.


/i - run interactive, supercedes other options.  Requires access to pbuGui.dll.


/testcount - return the number of tests.  Output will contain testcount=#


/taglist - return a csv list of tags.  Output will contain tags=tag[,tag..]


/tagtests - return test #'s as a csv list for listed tags.  Output will contain tagTests=#[,#...]


/testlist - return descriptions for tests by number or tag.  Output will contain tests=desc[,desc...]


/o - set the output filename, default is testresult.txt


/a - append output.  default is to overwrite results on each run
So a couple of things to notice. If you use the command line, output is always written to the output file which is testresult.txt or the filename you specify. If the application is a PbWin application you won't see anything at the command line, even if you type /?.
Lets run through some command line examples first:
testapp_test /r 0 1run tests 0 and 1.
testapp_test /r 2 3 /arun tests 2 and 3 and append the results to restultext.txt.
testapp_test /testlist 0 1list the names of tests 0 and 1
testapp_test /testcountreturn the number of tests in testapp_test. Knowing this you can provide any test number from 0 up to (but not including) testcount.
testapp_test /taglistlist the tag names available.
testapp_test /tagtests onelist the test #'s that have a tag of one.
testapp_test /r 1 4 one /o test2.txtrun tests 1 and 4 and all the tests tagged with "one" and write the results to test2.txt overwriting any previous results.
testapp_test /r all /o all.txt /aRun all tests and append the results to all.txt.
These options should provide a way to create repeatable tests scenarios and capture the results. Finally lets look briefly at the interactive mode. The small GUI provided initially shows the following screen.
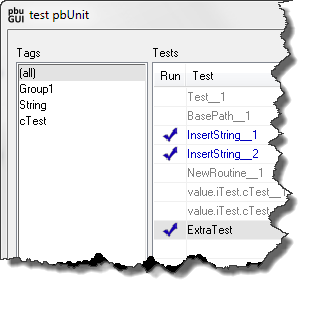
Selecting a tag will limit the tests to any tests with that tag. You can then use the All or None buttons to select or deselect the visible tests. Choose the tag (all) to display all tests in the application. You can toggle the flag of each individual tests by pressing the space bar or double clicking on a test.
Once you have selected all the tests you want to run (they don't all have to be visible), click the Run button. It will display the following screen:
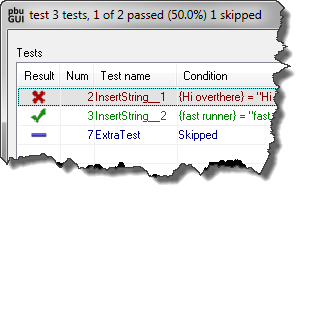
Initially you'll see Running test x of y and the Done button will be grayed out. Once completed you'll see Test results x of y passed (z%) indicating your progress. To return to the previous screen, close the window or click the Done button.
One last note on unit testing. As you'll soon discover, unit tests can be wrong and require some debugging. What's very nice about them is they allow you to apply a repeated set of tests that you can grow over time as you discover problems. And once a test is written you can be be sure if the problem happens again in the future it will be easy to find. Whether or not your a fan of unit testing this should provide one more tool you can choose to use to aid in the writing of correctly running software.
I hope you'll find unit testing with PowerBASIC to be easier and more enjoyable using the provided framework. As always if you have suggestions or would like to contribute to the documentation or source code please feel free.
Naming conflicts
It may have occurred to you that PbUnit is using your code and writing some additional code. You might be wondering, what names can I not use? In this version only two names are reserved: cPbUnitTest and pbUnitTestGui. All unit testing code is encapsulated in the class cPbUnitTest which is included with your source and pbUnitTestGui is the only exported function from pbuGui.dll.